Hi everyone...
Glad to be back!
We've just spent the first 3 months of the year renovating our upstairs bathroom and even though I tried to work on the bike AND work on the bathroom at the same time, it didn't work. At least I tried.
Anyway, last time I wrote I had just gotten my stand done. I wanted to put my "logo" on it somehow and thought I'd try something I'd never done before... I was reading about a guy who made his own "etched brass tags". In this particular instance, he was making a head badge for his custom bicycle, but you could use the technique for just about anything.
First, you need some brass... which, by the way... the cheapest I could find for a 1 square foot piece by .0625" thick brass plate was $50!!! Brass is spendy!
Once you source the brass, you need something that will eat it. I chose these:
Whatcha have here is your basic drug-store hydrogen peroxide, and some muriatic acid. This is the Home Depot, swimming pool stuff. Mix these together 2:1 (always add the acid to the watah... like ya oughta! -remember chemistry class?) Anyway, this gives you a cheap etchant. I could've gone to Radio Shack and bought a bottle of Ferric Chloride, but it's about $17 and this was half that... you know me...
Next, you need a design for your brass "tag". I just used my last name for my "logo" and went for a simple, slightly-retro look. How do you get the design transferred to the brass? Funny you should ask... DIY electronics geeks use something called "press-n-peel blue". It's a blue "paper" that you run through your laser printer. Print your design onto the paper (reverse if you're using letters) and the toner from the printer sticks to the blue dye on the paper... which is actually plastic. Then you take your printed blue/black paper and place it face-down onto your brass. Using an iron, you re-heat the toner which transfers it from the blue paper onto your brass. Voila! Like so:
Next: BATH TIME!
I mixed up 2 parts H202 and 1 part muriatic in a plastic tub. At first, it's clear, but as the metal starts to dissolve, it turns green. By the time this brass was etched, it was a very dark emerald green.
On a printed circuit board this bath would last about 1 to 15 minutes typically. Adding heat speeds things up a little, but for my 1/16th thick brass I left it in for about 11 hours! I really wanted a deep etch, but after 11 hours my resist (the black design part) started to deteriorate also and I didn't want a pocked-up design... so I pulled it.
I would've been totally stoked if the etchant ate away half the thickness of the brass, but it didn't. You can still see the "raised" letters though, and I was very happy with the results:
NOW the work begins... cutting them out, filing the edges flush with the border. Lots of hand-work...
Here's one mounted on the stand:
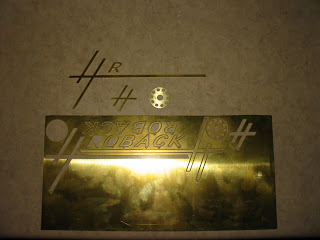
Since I didn't know how this whole thing was going to turn out, I decided that I would use my left-over brass for "cut" letters also. Just in case the etching didn't go very deep, or if I ruined it, I'd just have my waterjet guy cut the letters out and I'd attach them to the brass plate. The letters would definitely stick out more, and the whole tag would be twice as "dimensional". So, off goes the brass and a pdf file was sent. This is what I got back:
I TOTALLY LOVE waterjet cutting. These letters are about 3/4 of an inch tall, and they're perfect. I was able to surface-sand each one, polish them up, and then "attach" them to my etched plates with some CA adhesive (super-glue).
I thought spray-painting the plates flat black, then wet-sanding off the high spots would look cool... so I did that, then added the individual letters... and this is the final piece:
I'm super happy with it! I had fun, and learned about chemistry.
So now you're asking yourselves... "Hey Dan, what does the summer hold?"
...Again, thanks for asking!
Goals for Summer 2013:
1. Finish stand.
2. Rearsets. (Foot-pegs, brackets, levers, and all linkage)
3. Front and rear brakes (re-build calipers and master cylinders, new lines, pads, etc.)
With these 3 goals met, I'll be able to have a pretty awesome "coaster"! -I still won't have a seat, but I long for the day when I can push my bike to the top of a near-by hill, stand on the pegs and coast down to my house! I promise I won't make any goofy engine noises or pretend I'm crouching down behind my race-bike windscreen to get that last bit of aero-dynamic slipstream... but, I really want to feel how the bike rolls, turns, leans... how slow or quick is the steering... how heavy or light does it feel... what will be my "view from the cockpit... all that stuff. It's pretty weird. This thing never existed before, and now it's getting to the point of me actually being able to try it out soon. I'm nervously humble - if that's even an emotion. I'm hoping my math was right, my intuition was right, my time, imagination, fabrication, etc... and if it was, I'll have the biggest, dorky grin as I coast down my hill... again!
Thanks for reading!


No comments:
Post a Comment