Monday, December 12, 2011

More frame progress... and an introspective look at the end of year 2

You saw the "backbone" of the frame in my last post and now I've completed the "down tube" which extends down from the steering tube down to the front of the engine.


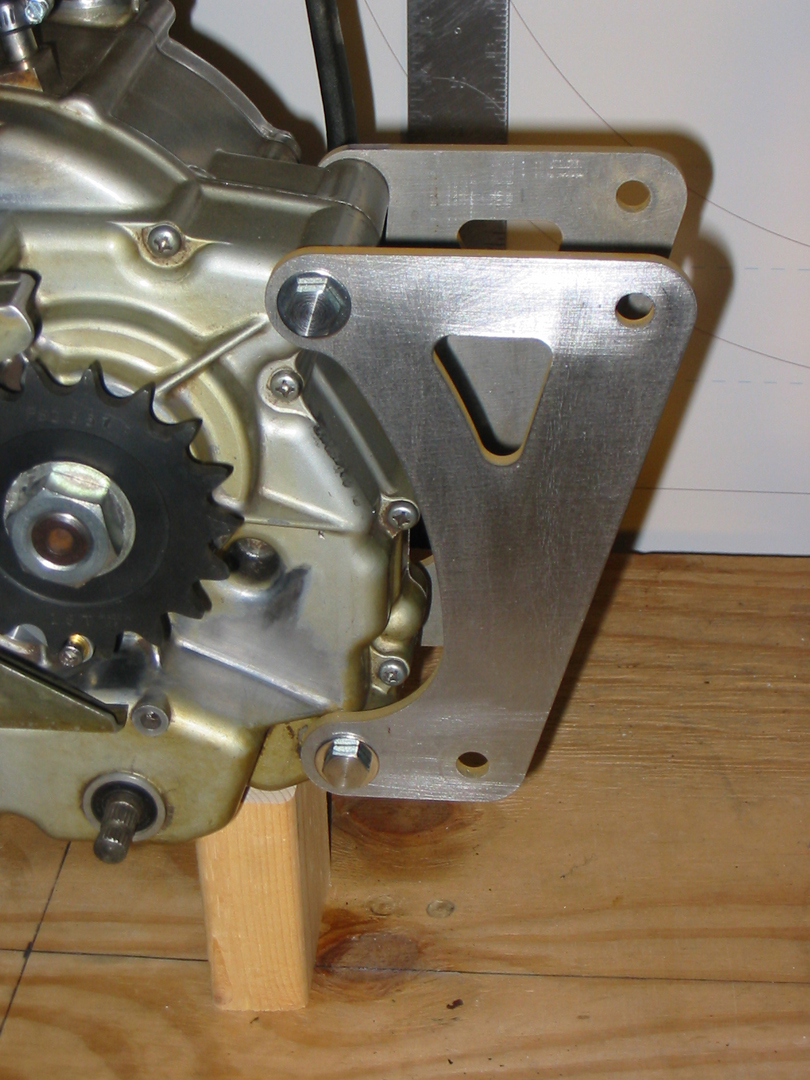
You may notice in the photo that you're looking at the OTHER side of the bike. Normally I have it up against the wall and you see the left (or kickstand side) of the bike... more on that later...

The down tube was my hardest fabrication project yet. I had to roll the tubing in one direction to get one curve, then flip it and gently work in the "re-curve".  It's almost impossible to do this perfectly with the roller I have.  And, it's not perfect, but at least I have the profile I wanted. On an expensive, computer controlled roller this could be done, but you don't want to know how much that costs... Anyway, I'm pretty happy with it. The next hardest part of fabbing this tube then became cross-drilling the "piercing tube" holes for the front engine mounts. Lots of fitting/re-fitting on the drill press to make sure everything was exactly perpendicular to the bends in the tubing. Again, really hard on the equipment I have, but doable.


So, overall this frame is exactly what I had designed so far. The rear triangle is still in the design stage, but probably 85% done. When this thing becomes a roller, I'll be really excited! There is WAY more to consider when figuring out the rear end, and a real challenge in trying to visualize / carry out a 2-dimensional drawing into 3 dimensional space...

Which brings me to my introspective look at the end of year 2...

I wanted to pull the bike away from the wall and into the center of the garage. I haven't done that yet, and I was excited to walk around the bike and look at it from other angles / sides. By doing that, I was able to stand far away and look at the lines. I could look at the back of the bike from a distance and sight the line of the backbone from the rear wheel up to the steering tube...

...and that's when I noticed it.

In my 2-dimensional design world, everything is absolutely perfect. I have lengths, widths, angles, and radii all precisely plotted out. Rake and trail dimensions have all been worked out by complicated sine-cosine tangent equations. (who says I'm no good at math?) This is all awesome, and necessary to create a machine that will place one wheel exactly in line with the other, and will handle better than a shopping cart.

My BIGGEST challenge is to be as accurate as I can when turning a perfect drawing into a real thing. Steel is real. Bending tubing is real. Drilling holes and machining parts is real. It's easy to use a computer for creating exact parts, but my hands and brain aren't a computer. My eye doesn't see that 3rd dimension so well. My tubing roller has some play in it. My drill press may have a slight run-out. My build platform may not be perfectly level where it sits up against the wall.

All these things have micro (and compounding) effects on each other and everything else. It's kinda like math... Say you're studying algebra and you don't quite understand something. Next week, your teacher moves on to the next section and you don't understand that either... or the section after that. You need to understand it all, and make sure it's perfect before you can move on.

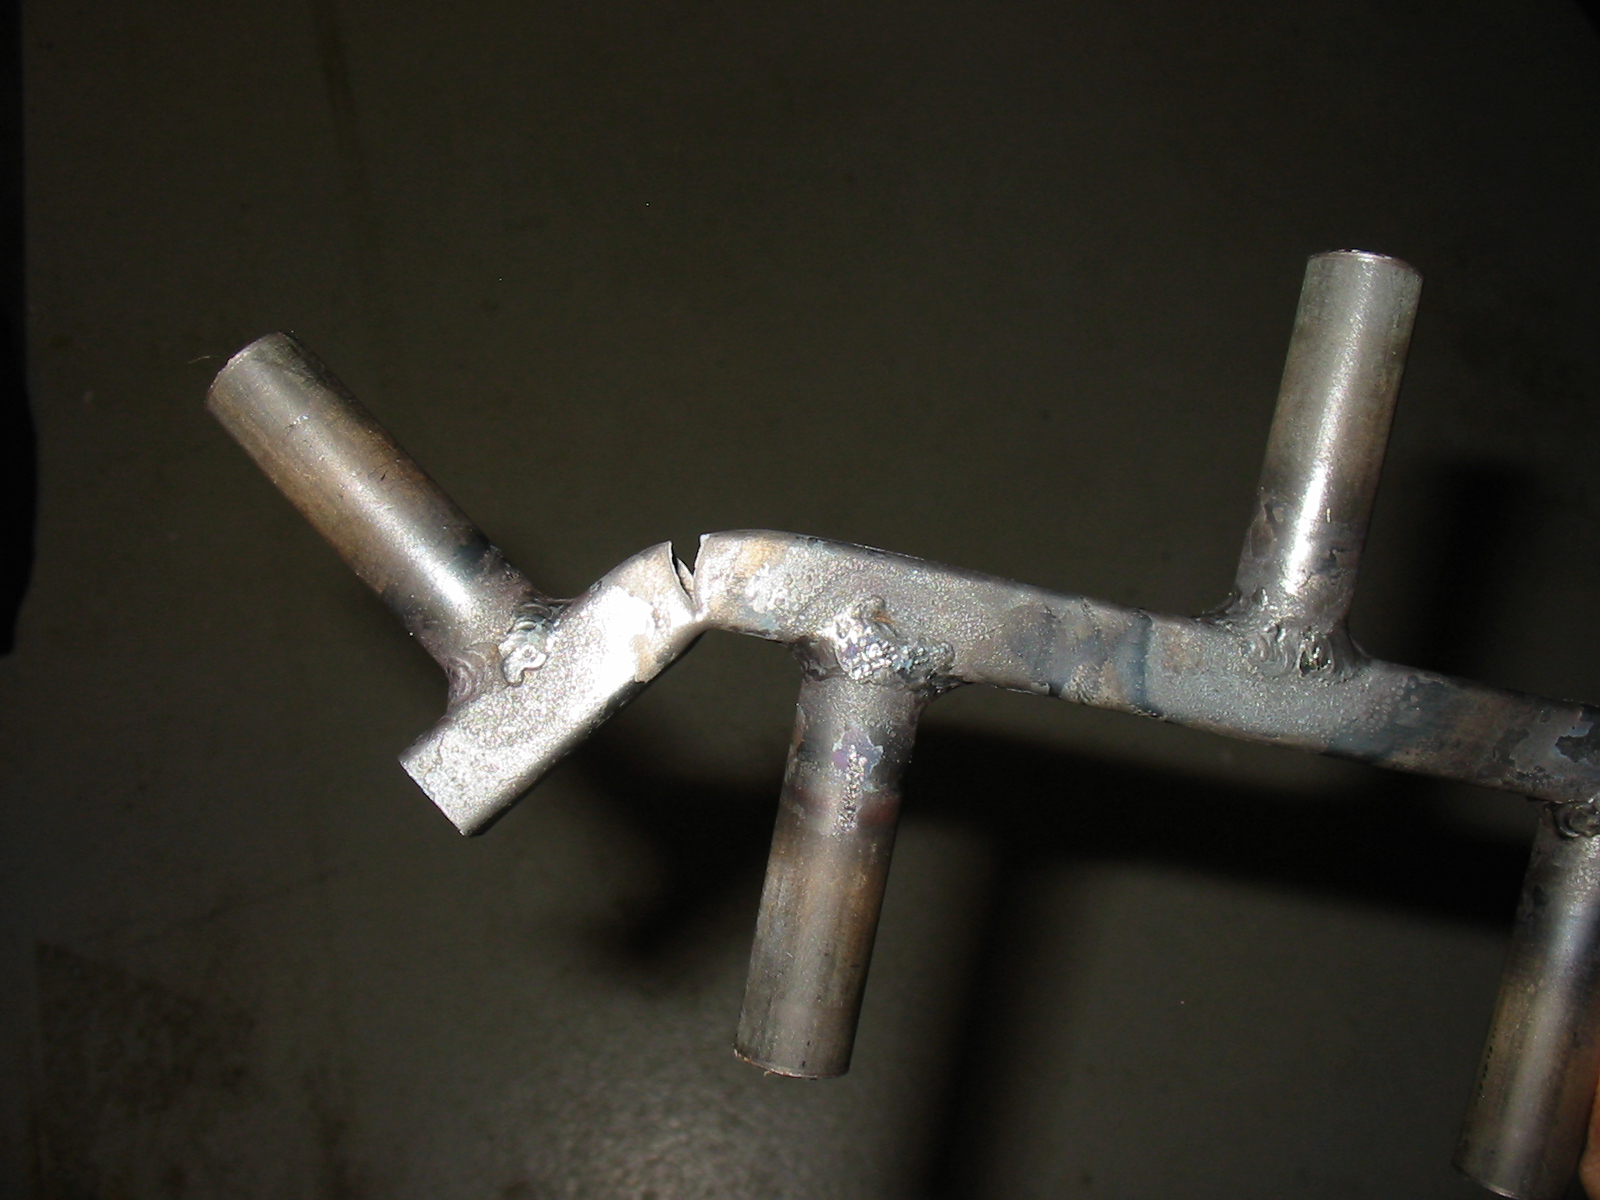
I have some areas on my bike that need (or have needed) attention since day one. It's just that now I'm able to see the issues now that I have some frame tubing done. It was impossible for me to know back then that I needed to spend more time making sure things were level / perpendicular / measured more accurately before moving on.

What I need to do is not that bad, and I'm thankful I was able to see it now so I can fix it. I have pretty high standards for this kind of stuff and I can't just let it go. At first, I felt kind of defeated like this project was spinning itself out of control, but it's really not. It's just a reminder that there is a human directing this project.

There is a quote by Theodore Roosevelt Jr. that came to mind when I was kind of depressed about my inaccuracies... I've pasted it below. It kinda pulled me out of my funk yesterday. I WILL see this project to completion, and like I've said the whole time... I'm learning more about design, fabrication, and manufacturing each time I enter my "parallel universe" (garage). I'm doing it the hard way, but when I look at where I've come from to where I am now, I wouldn't have changed anything.

It is not the critic who counts; not the man who points out how the strong man stumbles, or where the doer of deeds could have done them better. The credit belongs to the man who is actually in the arena, whose face is marred by dust and sweat and blood; who strives valiantly; who errs, who comes short again and again, because there is no effort without error and shortcoming; but who does actually strive to do the deeds; who knows great enthusiasms, the great devotions; who spends himself in a worthy cause; who at the best knows in the end the triumph of high achievement, and who at the worst, if he fails, at least fails while daring greatly, so that his place shall never be with those cold and timid souls who neither know victory nor defeat.
Theodore Roosevelt
April 23, 1910 


Sunday, November 27, 2011

Keep on Rollin' baby...

Dang... 2 blog posts within an hour!
I'm on a roll... GET IT?

I'm funny.

So Fred the body-man and I went in on this Harbor Freight tubing roller together. I needed it for my motorcycle frame, and he wanted it for some custom car, garage stuff that he does. I think combining the 20% off coupon, plus the holiday sale, plus our (undeniably ravishing) good looks, we spent about $50 a piece for it. It pretty much lives at his garage, but it was a necessity for me and I was glad to go in halves with him on it instead of me paying for all of it for what may be a one-project use.
I could probably use it on my next motorcycle project, but I won't bring that up to my wife just yet...

So, this roller came with 1 inch, and 1.5 inch, round tubing dies... how convenient! That happens to be EXACTLY the diameters of tubing I'm using on my bike! How'd they know?
I mounted it to my vise using a length of 2x4 and started rolling. There are lots of 4x4 guys using this roller to make custom rock crawler roll cages and bumpers, and there are lots of youtube videos showing it... but I didn't know how much effort really went into it. Those guys must be bodybuilders because it took me about an hour and a half to go from this:


to THIS:


My hands and shoulders were actually sore. That is 1.5 x .083 wall-thickness tubing. I think the 4x4 guys are using at least .120?! Anyway, I guess that says something about my upper body strength doesn't it? Actually, to give myself a little grace, there is a guy selling a "tubing roller side-plate kit" which repositions the lower rollers farther apart which in turn, reduces the amount of force needed to bend, and run the tubing through the roller. He too must be a 135 pound hulk like me...

So, when rough-cut and mitered we're actually starting to take shape:


Now here's where I have to honestly say that I'm giddy looking at this picture. I have spent so much time thinking, drawing, planning, tooling, and then re-thinking, re-drawing and re-tooling this thing, and to see it like this makes me smile. Even if you hate it, and think it's a stupid project, I get all warm and tingly seeing all that time and effort manifest itself into a tangible, 3D object.
Dang. I did that.
Makes me feel good. I have TONS more to go, and to try and plan everything out all at once is truly overwhelming to me, but maybe it's a good thing that I have such a small budget. It gives me the time and freedom to really make sure I can plan out, and continue on with that next step.

Thanks for being there to share this with me.
Until next time...

Water jet was it.

After knowing in my gut that water jet cutting was probably the way to go, I sent some metal out to California to be cut properly. Hydrocut Waterjet was one of the only businesses (that I found) who offered a "no minimum" policy. Most places have a minimum of $150 just to turn their machine on which in my case was way too much for the few pieces I had to get cut.

So, this being my first time sending out digital files to a CAD system, I was hoping everything would work properly. I probably over-did it, but I sent printouts of what the final pieces should look like (to scale of course...) just to prevent being disappointed when I got the parts back!

So I wait a week, and this nice box is waiting for me on my doorstep...

Honestly, I was a little nervous to open the box, but when I did, I found this:


And THIS!


That is what I had in mind the whole time. And, it's about as perfect as you can get. The edge is like a fine bead-blasted finish. Pretty crazy for a high pressure stream of water with a little garnet dust in it!
They even left the parts "attached" in the steel plate by leaving a tiny hair of steel left uncut so all I had to do was bend the pieces back and forth a little to get them out. Kinda like when you'd remove model car parts from the plastic tree when building a model...

So, when attached to the engine they look like this:


 And with the rear frame tube attached, this:


It seems like I've been waiting FOREVER to get this far! ...but it has enabled me to finish up the design of the rear axle plates, disc hanger, chain adjusters, rear-end lifters for the rear stand, etc. Since my budget is ...um ...small, that was all I could do.

But, we're starting to get a little more momentum now.
I picked up my tubing roller from my friend Fred the body-man so I can start on the "main backbone" of the frame next. That will have the nice, gentle curve from the steering head to the rear of the engine. -That's where the roller comes in...

Check back soon! 

Wednesday, October 19, 2011

Success... and disappointment

Seems like lots of time has passed by since my last post...

The past few weeks have been good, but also not so good.
First, some good:

I ordered my first shipment of raw materials


Believe it or not, that's about $150 worth of metal... The 2 large squares are 6061-T6 aluminum. One is .375" thick and the other is .25" This will be turned into engine mounting plates. The rest is 1020 steel tubing in varying diameters and wall thicknesses.

I started with the frame tube that will go from behind the engine up toward the seat. It will angle backwards at a 15 degree angle, and "piercing tubes" -my description- will be inserted through it. The mounting bolts will pass through these piercing tubes.


Once the piercing tubes are fit, and the engine mount plates are in place, I'll start tacking everything together. Keeping everything square and straight will be my challenge...

Another tiny little detail about old machines I've noticed are that the bolt heads are usually bare, or turned. If I were to go to the Hardware store to buy bolts, they're all stamped or have the grade on the bolt head. This is fine, but I kind of prefer a "turned" appearance. I know they're all grade 8 bolts, but I don't need to advertise it. Kinda like that car dealer sticker on the back of your car... So, I've been turning all the bolt heads, and making the nuts sit flush with the end of the bolt.
Call me insane...


And now for the disappointment...

I found a local guy with a CNC plasma cutter who agreed to cut out the engine mount plates. I met with him and saw some of his work. It wasn't perfect, but it would be good. When I picked up the pieces, he wasn't happy with his work so he just gave them to me without charging me. A nice gesture, but according to him, he wasn't used to aluminum of this quality and it gave his machine a hard time. So, long story short... I can't use the pieces. The edge isn't square, and for me to make it square would remove too much material. Every cut edge is tapered, and the taper goes in all directions.
So, although plasma cutting aluminum is possible, and can sometimes be a great way to achieve desired results... this guy, on this day, with this machine, with this aluminum didn't happen.

The best method would've been water-jet cutting... which is where my new metal is now. Hydrocut Waterjet in Hunnington Beach CA.
I kind of knew I was taking a chance on the plasma, and it bit me. So, note to self...
go with your gut and don't waste money. I HATE wasting money.

Live and learn.... and I gotta say... there's a lot of learnin' goin on!


So, STILL nothing real to look at... I promise it's happening, it's just going a lot slower than I thought.

Thanks for looking!

Sunday, September 11, 2011

The Training Wheels are comin' off!

So, to recap really briefly:
   I got this cheap bike as a starting point to make a custom board track-styled motorcycle
   The first goal was to make the engine run reliably, and possibly add a little power.


   The second goal was to purchase some gas welding equipment, and actually learn to USE it!


   And here is 9 months worth of welding practice
I think my favorite practice piece is the v-shaped piece in the front. I used to have a Cervelo P2k triathlon bike with some aero bars on it, and I always liked those bars. When I got my "practice kit" of steel pieces, there was some aero tubing in it so I thought instead of just making anything out of it, I'd try to reproduce the general shape of the bars. After cutting, fitting, and welding, I put an abrasive/polishing disk in my drill press at a high speed and shined up the "bars". Here's a close-up


So, I am by no means a journeyman welder, but my skills have progressed to the point of me "taking off the training wheels" so to speak. I believe I am ready to start on the real stuff. It's MY butt that is going to be on this thing (with no suspension remember...), so believe me when I say that I am confident my welds will be strong enough!
I've ordered all the aluminum and steel that I'll need for the front triangle of the frame. That should arrive this week! I'm really excited to get started on it. I also found someone locally who has a CNC plasma cutter. He's the uncle of someone I work with, and because of that hook-up, he's only charging me $8 per part! For those who don't know, that's a screamin' deal.


Stay tuned... the next entry should have some engine mount plates made (kind of like the old Harley "Keystone" board track frame design) and possibly the "seat tube" section of the frame.


I can't wait until this thing is a roller!

Merry Early Christmas!


As posted in my last entry, I made a quick mention of a drill press... Well, being that I am primarily welding tubing together to make this motorcycle frame, I needed a way to miter (fish-mouth) the tubing ends so I could fit them properly. So, one of the ways is to use a drill press and a hole-saw. I needed to find a drill press that would slow down enough to cut steel. I found a few that would fit the bill, but they were not available locally...

So, instead of being able to plunk down some cash for a new tool, I also had to consider shipping (on a tool that weighs almost 200lbs.) and find a location for the 18-wheeler to deliver to... And I haven't even mentioned getting if OFF the truck. Drivers aren't allowed to remove it (unless you pay another fee) So, if I wanted one of these "out of state" tools, I'd have to basically double the price to get it to my... work. An 18 wheeler wouldn't make it to my house.

I guess that's one of the things that I miss about living in the Chicago 'burbs... I could pretty much drive 20 miles in any direction and get anything in the world. Asheville, NC is a little different. Anyway... I digress.

So, I decided the Porter-Cable Drill Press from Lowes would fit the bill the best. Plus, I had a 20% off coupon for Harbor Freight that Lowes HONORED!!! You know how "they" say that it never hurts to ask? -Well, it doesn't!

Gracing the table of the drill press is a compound-slide vise. I don't plan on doing any milling on my drill press, but it sure cuts down on positioning and re-positioning of the vise! So far, I really like the setup.

So, this year, Santa (Deb) came a little early... Come to think of it, he (she) came early last year too. Last year was the lathe.

Slowly, but surely, the "shop" is coming along.

Saturday, August 6, 2011

Still practicing...

So, another blog post about welding.
Sorry if it's a little boring to watch, but it's all I've been doing lately. I ordered that box of 4130 cut offs to practice on, and it's getting hard for me to come up with new ideas for my practice pieces.
Most of my masterpieces start with a long piece of tubing, and I make little cuts to add to it. So, I guess I'm a "porcupine" artist.  I would imagine beginning welders would probably have tons of this junk laying around... Perhaps I'm in good company.

So, here are the latest:


Never mind the messy workbench... This one started off as your basic helicopter-shaped thing, then more and more pieces got added. The small pieces were mitered (or "fish-mouthed") so they'd butt up against the main tube. Some of these were mitered by hand with a file, and some were sanded with a drum sander attached to a drill press... (?!?!) -See next post...


another view...


This one was a strength test. Seems my welds are strong enough yes?


This my latest piece. It's kind of like a "jack" if you remember those... But this was all mitered tubing.

So, I'm just trying to use up my box of practice pieces.
All of what you see here is for sale, if you're looking for some art for your home.
Please get in touch with me if you see anything you like.

Stay tuned...

Tuesday, July 19, 2011

Ok, how about a post that's NOT welding?

You asked, I listened.
I get thousands of emails every day asking for more motorcycle-progress pics.
I can see how the welding stuff may be a little boring for some of you...

One of my first "real" welding projects was to build an "engine cradle." -That's what I call it anyway...


I built this so I could position the engine exactly where it needs to be in relation to the frame. The sprockets are perfectly lined up, the engine is level, and centered. The 3 bolts are to make fine adjustments. I think it may have to move toward the front wheel slightly, but from side to side, it's right on.
All you sharp-eyed viewers will notice 2 things... One, that's a HUGE counter-shaft sprocket on that thing! Yes, and it's custom. PBI made it, and it's really 18 tooth. There is a matching 42 tooth on the rear that a company called "Rebel Gears" made me. I had to go custom on the sprockets because of the rear hub/wheel combo. I'm using dirt bike wheel parts, and dirt bikes use very large rear sprockets. Plus, the fact that the rear wheel is 21 inch (!!) that plays a part also. SO, in order for me to get back in the ball park with the final drive ratio, I had to come up with a front/rear sprocket combo that would do that. The SMALLEST rear sprocket I can get is a 42 tooth. (without machining away some of the bolt shoulders in the hub... and I didn't want to do that) So in order to be somewhat close to the stock gearing, I needed an 18 tooth front. -Rebel gears again. They hooked up the PBI.

The second thing to notice in the photo is the nice, shiny silver patch on the case below the sprocket. This is what raw aluminum looks like. I'm glad to know that the brown, "gas stained" clear coat will come off with a little paint stripper and elbow grease.

So, now we're looking like this:


The drawing on the wall behind the bike is new as well... It keeps morphing into more detail, but I think I'm set on the final design/measurements. I have the "plates" that will bolt the engine to the frame tubes drawn out and those will be made out of aluminum... .375" for the rear plates and .25" for the front/top. I may have a lead on a guy here in town with a laser cutting machine, but if he doesn't work out, there's a water-jet company in Cali with no minimum charge on cutting. Hopefully I can keep it all as local as I can.

So what's next? Probably ordering my frame tube steel, and I think ol' Santy may come a little early this year... One of the little elves mentioned something about a drill press with a cross-slide vise. That would be about as close to a milling machine as I'd ever get, and a VERY nice Christmas present.
As usual, if you can hang on, I'll have more...
I promise.

Dang...

It's been almost 3 months since I last posted anything. Sorry to the faithful few who sometimes check this blog.
Much has happened though... I was able to meet with "Jim" the technical counselor from the EAA and it went really well. We pretty much just talked for the first hour. He lives on an airport like some folks live on a golf course. He can literally roll an airplane out his hangar and it's about a 50 yard trip to the runway. I couldn't believe that he actually prepared for my visit by setting up some flat 4130 sheet for me to run a horizontal bead on, and some mitered (super-thin) tubing to tack and join too. I had never worked with .020 tubing before. That was hard. But by the end of my visit, I was told that I was doing just fine... I just needed some "seat-time." -Practice... that is.
Airplane guys are just cool.

Here are some of my awesome sculptures:


This thing was pretty crazy. It started off as a couple pieces, but then I couldn't think of anything creative to do with it so I just kept adding new strips. There wasn't too much thought into this thing, it's just taken a life of it's own. I'm sure all beginning welders have this kind of stuff littering their workbenches...
This was my first attempt at brazing. I was at AutoZone and I found some $4 brazing rod. I'm sure it's junk, and all they tell you is that it's "phosphor bronze" rod. Yes, I know I over-heated it, Yes, I know it boiled, Yes, it's ugly, but see those bends? I COULD NOT break this thing. I went back and forth in the vise with a hammer, and it's still holding. I can assure you that I have gotten a little better at my brazing and heat control since this little experiment...

I bought a box of 4130 cut-offs from a company called "Aircraft Spruce." They sell a welder's kit for about $27. It came with a bunch of different diameters/wall thickness/shapes of tubing. Some of it was just cool. I LOVE aero tubing.


So, I started in on this stuff. There was a 1 inch diameter .090 wall thickness tube that I drilled .5 inch holes in. Then I inserted small lengths of .5 inch .083 wall tubes thru the big tube and welded them in... like this:


This is one of the better examples:


And for the last one, I did a little "fillet braze" joint. Bicycle builders beware...


I've probably tried every welding tip and gas pressure combination I can think of and for most of the good welds (in my .060 tubing) I've decided that my #0 tip at 5psi works the best. With the 1 or 2 tip I'm not flowing enough gas and I get torch pop. With the #0, It's kinda hissy with the gas turned up to melt the .060 steel, but I seem to have much better results. Perhaps that will change with more experience, but for now I think I may be ready to start tackling some of my actual frame.
The plan is to start with the main frame tube that goes from the back of the engine up towards the seat. Then the top tube connecting to the head, then the down tube from the head to the front of the engine.
-But, I'm not rushing this. These are the important tubes!

Thanks for looking! More to come...

Thursday, April 28, 2011

The learning curve begins...

Here we are. The beginning of Summer. As you all know by now, my goal this summer is to become a proficient welder (or Weldor as some of my books say...) So, I need an office. A little place to call my own where I can concentrate, study and learn. This is what I came up with...


This little beauty was assembled from scraps of wood found in my basement. It's a 24" square desk topped with ceramic tile... and a brick. Fancy, I know. At least I can sit and brace my elbows on the edge while I figure this all out.

I went to Lowes to get some steel to practice on. I bought a piece that was .125 inches thick by 36 inches long. I've been cutting that into small pieces as needed. I'm not sure why I bought .125 though... I probably should be focusing on some thinner material, but it's what I have now, and I'll certainly ruin it... or practice, I mean.

So here are my first "welds"...


The lower bead was just that... making a puddle and running it across the steel.  That was fun, so I grabbed another piece of steel, put it next to my first piece, tacked it at both ends, then went for it! Nothing like jumping right in! Purdy ain't it? I was so proud... until I put it in my vice and bashed it about 5 times with a hammer. Broke right off. Seems I only penetrated about a third into the steel. So I tried it again, same 2 pieces, re-welded. This time I made sure I had good penetration and when I did my destructo-test, I passed. Bent the steel in half about a half inch below the weld. I win!

So now you see how cocky I am! I tried various other joints... outside corner weld... (perfect)

and a (kind-of) "T-weld" (not so perfect... lots of undercutting and very "blobby")


So, as you can see, I need lots of practice. I've read about everything I can find on "gas welding" and watched a few DVD's, but there's nothing like doing it yourself... and seeing where you're deficient. I keep going back and referencing various things like torch settings, distance and angle of the flame to the steel, how clean the material is, etc. My issue now is that I don't want to develop any bad habits. So, why don't I enroll at the local community college and take a course? Because they don't offer oxy-acetylene welding. It's all electric... stick, arc, Mig, Tig. No gas or brazing/soldering. Bummer.

I just said to Deb last night "I need to find someone to look over my shoulder to make sure I'm not doing things really wrong... kind of like an instructor."

If I were Mig-ing or Tig-ing that is real easy... Gas welding, however is another story. It's like this "romantic" way of welding. It began in the early 1900's and leather-clad men would wield torches and wear heavy gloves and goggles to fuse steel together with fire! By WWII, they came up with Tig welding which was the same but used electricity and an arc instead of fire (which sped up production on the military assembly lines) Mig took over as a "low cost" alternative and the old romantic method of welding with fire has taken a back seat.
However...
The aircraft industry STILL gas welds. Even as late as 1990 some aircraft companies were still gas welding aluminum. Some still do today. Even the EAA (experimental aircraft assoc.) officially endorses gas welding and if you go to the Osh Kosh fly in you can attend a gas welding seminar.
So, in looking for my "instructor", I went to the EAA. Turns out there's a guy in the next town who is an EAA technical counselor. His job is to make sure that every home-builder has an airplane that passes it's technical certification. So we get in touch, and he's willing to teach this dude how to gas weld!
Pretty awesome.
I'm humbled, yet giddy as a little school girl at how all this motorcycle stuff seems to be coming together.

Thanks for reading, and I'll try to keep the posts up.

Friday, April 8, 2011

I'm Rollin'!

So, I told you I'd explain about the local shop lacing my front wheel...
I'm all for supporting local businesses, but it seems for me that I always have to go elsewhere to get good service.
I gave a hub, complete set of spokes and a rim to a local shop (who will remain nameless) just to put back together. After a week, he still couldn't figure it out so I went and picked it up. Only to see all the scratches he put in my freshly painted black rim. I was mad.
So, I boxed up and sent the parts off to Buchanan's again. They charged twice what the local place charged, but at least they did it. I have to say, I'd rather have my body riding on some quality wheel-smithing rather than something a shoddy local shop put together... or didn't. It was a blessing in disguise.
Anyway, the drama is over, and now we have...


Yep, mounted to the table, exactly the wheelbase I want ready to have some frame tubes connected.
Actually the next step is to build/weld an engine cradle that will hold the engine in the correct position, bolt that to the table, then really start bending/connecting frame tubes.

I just got 3 welding tips, so that journey begins now. I'm finally finished with goal #2. Goal #3 is the welding and I'm really excited!

How 'bout 1 more...


More updates to come...

Sunday, March 20, 2011

Rear wheel is HERE!

I came home to a large box on my doorstep last week! It was the completed rear wheel that was made by Buchanan's. They did a great job on it. I can see where they re-angled the spoke bores in the rim to make the spokes pull straighter instead of being slightly bowed (due to the wider rear hub they're laced to...) and they also "kinked" the spokes slightly at the hub so they would sit in the hub bores straight. All in all, I'd say I'm extremely pleased by their work.

Now... if I could only get my local guy to figure out the front wheel I'd be in business... More on that later.

In the mean time, feast.

Rear 21" rim for the GN400 Boardtracker project

Saturday, February 12, 2011

Stand by...

Well, I'm at a small waiting point.

The engine works well and is on my work bench waiting to get cleaned/stripped. (there's a clear coat on the engine cases that has been stained goldish-brown by a leaky carb and old chain lube)


 The rear hub and rim have been shipped off to Buchanan's Spoke and Wheel in Azusa CA to be built.

The front wheel is being re-assembled by Hagen's Cycle here in Asheville.

Front wheel (before. the final won't have the knobby tire...)
Mmmmmm. Tasty polished spokes ready for the new wheel assembly
 The front end has been assembled and fits perfectly.

So, I'm waiting for the wheels to come back.
Once they get here, I'll be mounting everything to my work table. This will be the "base" for the whole project. I'm going to bolt the rims to the table (through the air valve holes in the rims) along a centerline so they're perfectly in-line with each other. I've designed the bike to have a 1389mm wheelbase, 24 degree rake, and 95mm trail... (not so coincidentally the same as an '06 CBR600RR) After the wheels are fixed, the forks/triples/head tube will be installed and the rest of the frame will be fabricated from there.

That's when it'll be more exciting. It will actually start looking like a motorcycle.

So that's where I am. I think this is an excellent time to bust out the welding stuff. I'm excited to start that "learning curve." This blog may turn into a "look at this awesome weld!" blog for a while, but please stay tuned... I promise to get back to the bike.


Speaking of the bike, wanna see my favorite part so far? It's the fork caps. It's a combination of large stainless steel washers with small brass washers in between. Plus the spiked acorn nut on top. Probably nothing to you, but it's my favorite part so far. It started it's life 21 years ago as a Yamaha YZ250 fork cap that had a large hex head (for removal) and in the center was a brass needle valve assembly for adjusting the rebound dampening. Don't you just love lathes?

See ya!

Sunday, February 6, 2011

Goal Number 1 met

My goal for the first summer (2010) was to get the engine running reliably. When I bought the bike, it "ran" but if you tried to ride it, it was a handful. It would cough, sputter, die right off idle, then the RPM's would surge once past half throttle... Needless to say, there were multiple things going wrong. So, I stripped off most of the "unbolt-ables" and was left with this.

I worked on the bike in this condition until the engine was behaving. I actually like the bike MORE stripped down like this than how it comes stock. The stock bike looks like every other early '80s motorcycle. Tall, top-heavy, and ugly. It could be anything... Suzuki, Kawasaki, Yamaha, Honda, etc. They were all the same back then (to me).

I remember the day that everything clicked. I had cleaned the carb about a hundred times, rejetted it due to my little pod filter (instead of an airbox) re-built the top end, new gaskets, cleaned years of carbon and crud out of the exhaust port, and replaced every little rubber o-ring and seal.

Kick #1... nuthin.
Kick #2... sputter, sputter, rummmmmmmmble... POP!
Kick #3... VRROOOOM!  putter putter putter putter...   like a kitten.

Success! So what do I do? Quick grab the seat while it's idling (perfectly, mind you) bolt it one, and point it towards the street. Here we go!

I probably only rode around for a couple minutes, but it felt so GOOD! I shut it off, went inside to tell Debbie (my wife) then went back outside to see if it would do it again.

It did, and it's been a 1-2 kick bike ever since.
 So now, the engine sits on my work bench and it's starting to get a bath. Years of chain lube, leaky gaskets and dripping gas has discolored the clear coat on the engine cases. I plan on taking it down to bare aluminum and leaving it. I just want it to be silver... not dirty brown.

The stripped-down bike is no more. I have the 2 pieces I needed to build my project bike... and that was the engine, and the head tube of the frame. See, the head tube has the serial number stamped into it. That tube, along with the bikes title is worth it's weight in gold. Now I can begin bending and welding steel to the head tube to fabricate the rest of the frame.
Blurry pic of where the head tube used to be...
The start of the new frame
Goal #1 = met.