Saturday, February 12, 2011

Stand by...

Well, I'm at a small waiting point.

The engine works well and is on my work bench waiting to get cleaned/stripped. (there's a clear coat on the engine cases that has been stained goldish-brown by a leaky carb and old chain lube)


 The rear hub and rim have been shipped off to Buchanan's Spoke and Wheel in Azusa CA to be built.

The front wheel is being re-assembled by Hagen's Cycle here in Asheville.

Front wheel (before. the final won't have the knobby tire...)
Mmmmmm. Tasty polished spokes ready for the new wheel assembly
 The front end has been assembled and fits perfectly.

So, I'm waiting for the wheels to come back.
Once they get here, I'll be mounting everything to my work table. This will be the "base" for the whole project. I'm going to bolt the rims to the table (through the air valve holes in the rims) along a centerline so they're perfectly in-line with each other. I've designed the bike to have a 1389mm wheelbase, 24 degree rake, and 95mm trail... (not so coincidentally the same as an '06 CBR600RR) After the wheels are fixed, the forks/triples/head tube will be installed and the rest of the frame will be fabricated from there.

That's when it'll be more exciting. It will actually start looking like a motorcycle.

So that's where I am. I think this is an excellent time to bust out the welding stuff. I'm excited to start that "learning curve." This blog may turn into a "look at this awesome weld!" blog for a while, but please stay tuned... I promise to get back to the bike.


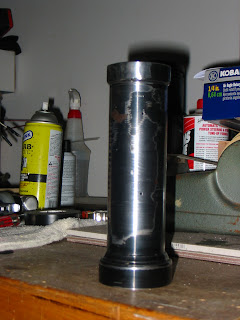
Speaking of the bike, wanna see my favorite part so far? It's the fork caps. It's a combination of large stainless steel washers with small brass washers in between. Plus the spiked acorn nut on top. Probably nothing to you, but it's my favorite part so far. It started it's life 21 years ago as a Yamaha YZ250 fork cap that had a large hex head (for removal) and in the center was a brass needle valve assembly for adjusting the rebound dampening. Don't you just love lathes?

See ya!

Sunday, February 6, 2011

Goal Number 1 met

My goal for the first summer (2010) was to get the engine running reliably. When I bought the bike, it "ran" but if you tried to ride it, it was a handful. It would cough, sputter, die right off idle, then the RPM's would surge once past half throttle... Needless to say, there were multiple things going wrong. So, I stripped off most of the "unbolt-ables" and was left with this.

I worked on the bike in this condition until the engine was behaving. I actually like the bike MORE stripped down like this than how it comes stock. The stock bike looks like every other early '80s motorcycle. Tall, top-heavy, and ugly. It could be anything... Suzuki, Kawasaki, Yamaha, Honda, etc. They were all the same back then (to me).

I remember the day that everything clicked. I had cleaned the carb about a hundred times, rejetted it due to my little pod filter (instead of an airbox) re-built the top end, new gaskets, cleaned years of carbon and crud out of the exhaust port, and replaced every little rubber o-ring and seal.

Kick #1... nuthin.
Kick #2... sputter, sputter, rummmmmmmmble... POP!
Kick #3... VRROOOOM!  putter putter putter putter...   like a kitten.

Success! So what do I do? Quick grab the seat while it's idling (perfectly, mind you) bolt it one, and point it towards the street. Here we go!

I probably only rode around for a couple minutes, but it felt so GOOD! I shut it off, went inside to tell Debbie (my wife) then went back outside to see if it would do it again.

It did, and it's been a 1-2 kick bike ever since.
 So now, the engine sits on my work bench and it's starting to get a bath. Years of chain lube, leaky gaskets and dripping gas has discolored the clear coat on the engine cases. I plan on taking it down to bare aluminum and leaving it. I just want it to be silver... not dirty brown.

The stripped-down bike is no more. I have the 2 pieces I needed to build my project bike... and that was the engine, and the head tube of the frame. See, the head tube has the serial number stamped into it. That tube, along with the bikes title is worth it's weight in gold. Now I can begin bending and welding steel to the head tube to fabricate the rest of the frame.
Blurry pic of where the head tube used to be...
The start of the new frame
Goal #1 = met.

"I get by with a little help from my friends"

When we moved to Arden, NC our neighbor 2 houses away was Ken. He is a saxophone repair/refurbish man. He has since moved about a mile away, but we still stay in contact with each other. Ken is an interesting guy... He is a genius metal-worker, Mercedes Benz nut, and seems to know a lot about pretty much everything. All this is the makings of a great neighbor. He has every tool known to man, and if he notices you working on something, he'll bring a handful of his tools (along with shop rags) to see if he can help. The awesome thing is that all his tools say the same thing... "Snap-On." To the average person this is no big deal. To any mechanic, this is a huge deal.

So right before Ken moved away, the Snap-On guy delivered a nice, big, shiny, red thing to his house. Turned out to be a big media blast cabinet!

The bike I'm building started off as a 1981 Suzuki GN400. So far, the rest of the parts I'm using are from a 1990 YZ250. This means that the newest parts are STILL 21 years old.

Man. If I only knew somebody with a media blast cabinet...

Ladies and Gentlemen...
I present to you...

Brake rotors.

I don't have the "before" pictures of these, but lets just say that they weren't silver.

Thanks Ken!

Saturday, February 5, 2011

The means to "the ends"

I have the engine, but was thinking about "the ends." Specifically the front and rear ends of the motorcycle. I knew I wanted NO suspension, but where do you actually get a "no suspension" and how do you incorporate it into a (semi) modern motorcycle frame?

Well, lets start with the wheels.

Boardtrackers had huge rims. I don't know the sizes, but they were big. What's a big rim size today? 21inches? Dirtbikes use them, and some Harleys... but being the "anti-Harley" that I am, I'm sticking to the dirtbike wheels. Dirtbikes also have good brakes. I wanted to capture the soul and appearance of the old board trackers, but have modern conveniences... like brakes. Good ones.

So far, it looks like I needed to start looking in the motocross world for leads. Turns out that Yamaha's wheels both use 36 spokes each front and back. So, if I want to lace a 21inch front rim to a rear hub I can do that because of the common spoke count. Ok, so a few weeks of searching ebay nets me the front and rear ends of a 1990 Yamaha YZ250. I disassembled the wheels, forks, triple clamps, gave my friend Fred the body guy the hubs, rims, and triples to be painted black... and look at them now!


Next was the new wheel bearings


and finally, the incredible front end!


What you're looking at here is a set of triple clamps from a Kawasaki KX500. Why did I choose those? Because they use the EXACT same steering bearings as the 1981 Suzuki GN400... my donor bike. Gotta love the internet for searching information like that! Notice the nicely machined bushings between the triple clamps and fork tubes! Those tubes are what slides in and out of a normal set of dirtbike forks. They also fit perfectly with my frame and wheel size. -Instant "no suspension!!!"

More to come on this! It's getting exciting now!

Making it happen (part 1 of 876)

I remember a phone conversation with my friend Todd about this project and how excited I was about it. His first question (obviously) was: "how are you going to do things like... weld tubing together for the frame?"

I had an answer.

I said... "well, this is a long-term project and it'll probably take me years to get it done."

How's that? I should be a politician.
I have always wanted to learn to weld. I've looked into taking classes at the local community college, bought books on welding just to read for fun, and I probably have more head-knowledge than most people on the subject. The only thing was... I didn't have a welder. From my reading, I decided that I wanted to get an oxy-acetylene outfit. For one reason, it's relatively affordable, and for 2, I can weld, braze, heat/bend and cut with it. With a MIG or TIG setup, all you can do is... weld. TIG would be the ultimate, but it's too expensive, and actually learing to oxy-fuel weld is the same procedure. I'm just using fire instead of electricity. So after months of trolling Craigs list I find these!


Would you believe that the seller lives in my neighborhood? Would you believe that I got the 2 cylinders, regulators, hose, Victor torch and cutting head for $150? Dang.

Then, not a week later I get a call from my friend Fred. He works with a guy who had a small lathe he wanted to get rid of... $300! So, I tell him that I just bought a bunch of motorcycle parts and I didn't have the money. CRAP! So what did I do? I went and lamented to my wife about the ultimate deal that slipped through my fingers. She asked me if I wanted that to be my Christmas present? She's the best wife in the world! So, a couple days later, this is now in my basement:


It's small, and Chinese, but it works really well for the things I need. Basically it turns metal into shiny little chips that embed themselves into the bottom of your shoes. Then they get tracked all throughout the house. It's really great! Plus as a side note, it makes great spacers, plugs, and bushings.

So there we have it. I have welding equipment, a lathe, and a huge desire to use them. The lathe has gotten lots of use making a tach cable plug for the rocker cover on the engine, the spacers between the fork legs and triple clamps, and recently the fork caps... pics to follow soon.
The welding stuff has just been sitting pretty since I got it, but in a week or 2 I'll start my welding journey. I'm officially giving myself 6 months before I weld anything structural on the frame. I can't wait. It'll be fun.

Design Philosophy

Ok.
So we nailed down the general outline of the project in the previous post. Now, getting to the details. I've been all about simplicity lately, and my goal in this project has become more and more "keep it simple." I love the fact that the engine of this bike is a kick-start-only, single cylinder, air cooled, SOHC 25 horsepower engine. It doesn't get any simpler than that! (although I know there's more performance available... Racing versions are making 50-55 HP! That's good for about 125mph)

So, now for the rest of the bike. I like the old boardtrack racers from the 'teens to early 1920's and wanted to use that style and appearance for my project. Check these out:
1915 Cyclone Board Track Racer
Indian Board Track Racer

Notice there's no suspension. (or brakes, or transmissions for that matter) I love the skinny tires, brazed-lug frame construction, simplicity, etc. These were ridden flat out on wooden tracks back in the day. Some racers lost their lives, and it became a very popular spectator sport due to the danger involved. It didn't last too long however. The bikes still remain some of the greatest racing machines in motorcycling (in my opinion anyway)


So back to my project... kinda
My friend Dave Moore and I used to go cycling on the Blue Ridge Parkway on Saturday mornings. There are some places where hitting 40 miles per hour (on road bicycles!) happens fairly easily, and because the Parkway has near-perfect asphalt, it's not too scary. Now, my bicycle is a Cannondale and it's made out of huge-diameter aluminum tubing. This makes it very rigid. The tires I roll on are 22mm wide and are run at 105 psi. This means that if I run over a bug, I feel it.

So who cares?!?!

I figured that if going 40 mph on my roadbike felt fine, then a fully rigid motorcycle going 45-50 on that same smooth asphalt would be ok too.

So it's final then...
A fully-rigid 25 horsepower motorcycle purpose built for the Blue Ridge Parkway and surrounding curvy roads it is.